
Welcome back!
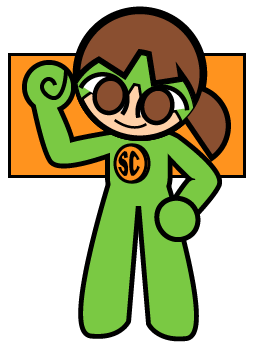
Today I’ll show you some things I learned while drawing this illustration of Super Captain, a super hero character designed by Alex Luzula.
Most of this illustration was created with simple rectangles (M), circles (L + Shift), and a liberal use of the Shape Maker Tool (Shift + M).
There are two big concepts I learned while making this design:
- Using the Pen tool and the Anchor Point Tool to mix smooth and curved lines.
- Using the Envelope Distort function to warp text.
Of course, check out the end of the article for useful keyboard shortcuts.
Let’s begin!
Bezier, Pen, and Anchors
Typically when you want to draw a curved shape with the pen tool you’ll want to click to create an anchor point, move the cursor to the place you want the peak or valley of your curve and then click and drag the cursor.
The second click will place down a straight path between the two anchor points you made and bezier handles will appear as you hold and drag. These handles steepen the curve on both sides of the anchor point as they grow.
But what if you don’t want the curve to steepen on both sides?
Sometimes its useful to mix curved paths with straight paths. In order to do this continuously as you draw, you’ll need to be comfortable with using keyboard commands to switch between the Pen tool (P) and the Anchor Point Tool (Shift +C).
Do this by having the Pen tool selected and then hold the Option key. The Anchor Point Tool will appear as long as you keep Option held.
If you click on an anchor point that already has bezier handles, the next path you create with the Pen tool will be straight.
To learn more, try this very informative video from Andy Tells Things on Youtube. I recommend the segment at 5:13, he demonstrates this exact process.
Envelope Distort
You’ve probably noticed the lettering on Super Captain’s chest. You’ll need to understand the Envelope Distort function to create something similar.
Go watch this video by Design Made Simple on Youtube. Its a short video but a very useful one.
Basically, you’re editing a text box created by the Type tool (T) to make it fit into a shape.
You’ll need to draw the shape on your artboard and make sure it is sorted into the same layer as the text you want to warp.
You can use the Align panel to arrange selected objects, overlapping them with each other in precise ways. I recommend trying it out!
Once you’ve sorted and aligned your text to your shape, make sure the shape is set to be the topmost object in its layer, keep both objects selected and navigate to Object > Envelope Distort > Make with Top Object.
This will warp the text to fit the shape over it.
You can also use the keyboard command (Option + Command + C). Make sure that your shape and text are selected and in position before you try it.
On the Design
I enjoyed updating Super Captain’s design from the previous version. This version feels more distinct and detailed while still preserving the original’s simplicity.
I can see many opportunities to make short comics or animated loops with a design like this one.
Keep an eye out, I’ve done more with Illustrator that i’m excited to show off! Super Captain’s friends will make an appearance in future posts.
’till next time!
Keyboard Shortcuts
And other useful tips for macos.
| Rectangle | M | Hold shift to draw a square. |
| Ellipse | L | Hold shift to draw a circle. |
| Shape Maker | Shift + M | Default is additive. Click and drag through selected objects to combine them. Hold Option to toggle to subtractive mode. |
| Pen | P | Click to place anchor point. Hold and drag to create a bezier anchor point. Hold the Option key to toggle into the Anchor Point Tool. |
| Anchor Point | Shift + C | Click an anchor point to convert it from regular to bezier or back. |
| Type | T | Creates a text box. |
| Make with Top Object | Option + Command + C OR Object > Envelope Distort > Make with Top Object | Make sure that the top object is the shape you want the text to conform to, and that both the object and text are selected. |

Leave a comment